Monday, 28 August 2017

Kong's Lair!

With the jungle terrain now assembled ahead of our game of Congo my mind started to wander with regards to all the possible additional pieces I could add to make the experience truly immersive.  At the centre of table was to stand Kong's lair, described in the scenario as a tree large enough to shelter the great ape.  Well yes, I could have done that, but when you hear the words 'Kong's Lair', what do you think of?  Remnants of a once great civilisation, now lost to the ravages of time and the relentless march of the jungle?  Possibly a cave system with precipitous drops and steaming vents, hinting at the island's geographical instability or perhaps the remnants of those challengers foolish enough to attempt to dethrone the king of the jungle?  A tall tree just wasn't going to cut it!  
Just the very mention of Skull Island is enough to get the imagination racing and since Kong's first celluloid outing in 1933 it has remained a forgotten, secretive place where wondrous and deadly creatures have lived, undiscovered for millenia.  In truth, Skull Island could be a life's work, so how to bring a little bit of cinematic magic to the tabletop?  
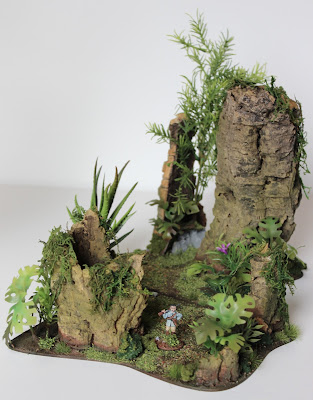
I often find it amusing how the most unexpected of discoveries can lead me on some of my most enjoyable flights of fancy and this was to be another case in point.  As I was perusing the virtual aisles of 'Swell Reptiles' looking for that just so shape of plastic vivarium plant, I happened upon an 'Exo Terra Primate Skull'.  This was a small, 10cm x 9cm x 9cm white resin, humanoid skull for £4.99 and as soon as I saw it I knew that I had discovered Kong's lair!  Once safely delivered to Awdry Towers the hastily sketched plan was consulted and away we went, sawing, cutting and sanding offcuts of blue foam to form a base for my skull.  I had envisaged a cave like sculpture and so had to assemble the pieces to give the impression that the skull had be hewn from the rock itself.  I had limited myself to a fixed base size using the terrain tiles from 'East Riding Miniatures', which also had the added benefit of linking it, visually, with the 'Dangerous Jungle Terrain' pieces.
With the basic shape assembled I layered pumice gel to give it a more organic feel before rummaging through the bits box to see what other treasures I could unearth.  I happened upon some 'Fenris Games' ruined stonework rubble, which I was able to intersperse with my crudely cut blue foam pieces giving everything a little more depth and along with some of their large broken pots I started to consider the idea that offerings had been left to the mighty Kong to pacify the beast.  
This idea spawned additional, smaller pots and salvers* and then it was time for the skulls!  I'm not sure why, but I seem to have an array of miniature skulls from a variety of manufacturers and these were liberally positioned as if they were gruesome trophies.  Additional body parts littered the nest area of the interior before the final addition of some jungle vines, using embroidery threads, were added.
*Which were actually medieval shields from some long forgotten project! 
When it came to the painting, the piece was airbrushed with a couple of tones of grey* and then the earth matched to the previous stands.  Lots of washes were applied to give a more naturalistic feel to the rock as well as hinting to the never relenting creep of the jungle.  The final touches included some leaf litter and clump foliage with one or two judiciously placed tufts.  
*All rocks are grey, right?
With that my homage to one of the silver screen's most endearing monsters was complete, all that was needed now was to introduce Kong to his newly appointed lair.

Also added to the 'Command Stand' page.

Wednesday, 23 August 2017

Great Apes

When a scenario is entitled 'The King of the Apes', is stands to reason that you are going to need some Great Apes.  Now fortunately for me, I already had a few of these powerful primates kicking around the menagerie here at Awdry Towers and decided to get them all painted in order to make a more informed choice as to which one would star in the show.
First up, and the most expensive, was a Jungle Gorilla sculpted by Beau Townshend and available through 'Dark Arts Studios'.    Now I rather liked this sculpt, but the resin casting was a bit of a pig to put together, requiring a considerable amount of cutting, filling and drilling.  Whilst I was cleaning it up I was worried I was going to lose some of the fine detail, particularly around the mouth, but with a little care I managed to keep most of his fine dental work intact.    The jungle base, which had been thrown in free of charge, was nice, but in the end I decided to match all three primates on the same 40mm MDF disc from 'Warbases'.* 
*Not the chimp of course, who is based on a 20mm metal washer.
Next up a proud Silver Back from the ever dependable 'Wargames Foundry'.  This was part of the adventure box that I picked up at 'Salute 2017' and although a reassuringly heavy piece of metal, he seemed quite diminutive next to the first offering.  Mind you not as diminutive as Tarzan's Cheeta from the Lord of the Jungle set by 'North Star Miniatures'.  Not sure how he managed to justify his promotion up the painting queue, but he is rather sweet and so I was happy to add him into the mix further demonstrating, if it was ever required, that '28mm Victorian Warfare' is an equal opportunities endeavour, welcoming miniatures from all periods, genres and scales - just ask the Jawa in my 'Imperial Assault' booster pack!
Finally, and the one that I decided to go with to represent my Kong, was 'Crooked Dice's' Giant Ape. This really is a superb piece of plastic.  Wonderfully characterful and fabulously cast in a lightweight and crisp plastic, this again was a multi-part kit.  The difference here is that it required very little preparation and went together like a dream.
He really is a brute of an animal, but the pose rather cleverly disguises his true height and so you don't feel that it is a ridiculously giant creature.  Other than the face there isn't a huge amount of intrusive detail allowing a fair bit of freedom when it comes to painting.  
All three of my Great Apes, were given a black base coat, followed by a couple of passes with the trusty airbrush, initially with Vallejo Model Air's Sombre Grey then Engine Grey.  With a few of the details then picked out, and some dry brushing for good measure, they proved to be a relatively quick and thoroughly enjoyable job at that. 
SaveSave

Monday, 21 August 2017

Dangerous Jungle Terrain


So having successfully completed my 'blocking terrain' it was time to move on to the Dangerous Terrain, specified in the Congo rules.  Dangerous Terrain allows the miniatures to enter it, availing themselves of greater cover saves, but they must first explore the perilous jungle.  This exploration might prove fruitless, equally untold treasures might bestow victory points on those brave enough to venture in, but danger lucks in the shadows and on the roll of a dice your plucky band of explorers might find themselves trying to throw off the tightening coils of a python or be neck deep in sucking quicksand!  

What was required was a series of terrain stands that gave the impression of jungle, but allowed you to place your miniatures within them - step forward 'Major Thomas Foolery's War Room'.  Chris Schuetz is a tremendous miniature painter and modeller, I find everything that he does simply irresistible, but it was his post entitled '28mm Jungle Terrain' that was to provide the catalyst for my own build.  I have no intention in stealing Chris' thunder here, you need to see his brilliant tutorial for yourselves, but I shall indulge in a couple of my own observations.
As with Chris' designs I wanted to base my own efforts on MDF, but fancied something a little more irregular.  Once again Tony of 'East Riding Miniatures' came to my rescue.  Tony does packs of laser cut terrain templates and so I picked up a large and medium and simply stuck the corresponding shapes together before priming them.  This gave me a little relief, but at the same time keeping a sizeable playing area.  I continued to follow Chris' tutorial and had plenty of bits left over form the blocking terrain, however I needed to locate some of the more specialist items that he had used to complete the homage.  The first were the wonderful plastic, vivarium plants that he had simply picked up at the local pet shop.  Chris' post assured me they were cheap, but as I trawled Amazon and the 'Pets at Home' sites, I was alarmed at how much the same product was retailing for in the UK.  The problem I faced was that I really liked the effect they brought to the piece and so persevered, widening my search.  Fortunately I stumbled across 'Swell Reptiles' and my quest was over - the very same cheap plastic vivarium plants!
The next key material to source was the cork bark branches, but again this required a bit of a hunt around, finally arriving at the 'The Spider Shop' - don't sign up for their newsletter if you are arachnophobic!  Now sadly they seem to have stopped selling the cork bark tubes that I secured, but it might be worth contacting them if you fancy some for yourself.  I bought 2KGs worth for just under £20, not really knowing how much I would need and I can tell you now half that amount was enough for the five stands I created.  What I would add here is that if you get a chance to specify the diameter of your branches then do.  I didn't and whilst length is not a problem, you simply saw them down, some of the wider pieces I felt were too big for my needs.
All that remained was to simply put it all together, paint and add what additional details you desired.  In my case I used the same clump foliage and flock that I had previously employed along with different tufts and some leaf litter for the interiors.  I did manage to pick up some florist's moss roll, but struggled to use this as effectively as Chris had, partly down to my impatience, but nevertheless it does help to break the 'bark' feel of the trees and helps to tie everything together nicely.
I can't tell you how pleased I was with these and combined with the blocking terrain and the mat from 'Deep Cut Studio' I was now really excited about the prospect of playing the game.  By standing on the shoulders of giants, I was able to create a tabletop jungle beyond my expectations, thank you Gentlemen! 
All that was left now was to get the miniatures out and see how they looked, including some very excitable dinosaurs! 
Purely for reference the plants bought from 'Swell Reptiles' were:
Zoo Med Amazonian Phyllo (Small) £2.99
Zoo Med Borneo Star (Small) £2.99
Zoo Med Australian Maple (Small) £2.99
SaveSave

Saturday, 19 August 2017

It's a Jungle out there!

Well I have to confess that I know not where August has gone? One minute I am hosting my first ever 'proper' war game and the next I'm starting to think about dusting off the satchel in readiness for the new academic year! Now don't get me wrong there are no complaints here as I have had a fabulous week exploring dungeons and monster invested caverns through my newly arrived Kickstarter, 'Massive Darkness'. More recently, with the release of the A-levels here in the UK, I have been devoting some much needed time to the day job, but all this has conspired to keep from my plan of sharing a series of posts detailing the terrain build for the game, not to mention restricting the time available to perusing the many splendid weblogs that I so enjoy reading. So, as we edge towards another weekend, I think it is only fair to have a little me time?   

One of the key requirements for Congo is specific terrain, whether that be for the jungle or savanna expeditions, that can either be explored by your intrepid adventurers or restrict their movements by blocking their progress and line of sight.  Having selected a jungle based scenario for our first encounter I found myself reaching for the bits bag only to discover a selection of rather diminutive palm trees, abandoned from a previous adventure - more thought was going to be required!  

As has become the norm in such circumstances the noble art of Google Fu came to my rescue and before long I was thrilled to discover two particularly fine examples of jungle terrain building that would ultimately inspire me to complete my own.  The first was that of the '1000 FOOT GENERAL', entitled, 'Making Jungle Terrain'.  John's tutorial is absolutely superb and it would be foolhardy of me to repeat it here, blow by blow.  Instead I would encourage you to visit John's weblog yourself and I will simply restrict myself to detailing some of the subtle differences that I employed for my own build. 
The first of those differences was that I based my blocking terrain on some MDF shapes, sourced though the ever reliable Tony at 'East Riding Miniatures'.  This was a pre-cut bag of shapes that I simply stuck chunks of blue foam to.  The edges were then contoured and sanded just as John had instructed me to do.  Once primed and painted, do avoid aerosol spray paints at this stage, it was time to add the foliage.
Because the blocking terrain was now raised, the rather pathetically small palm trees that I had previously purchased were now back in the mix, but I was going to need more variety in both size and species.  There are now a good many posts detailing the surprising versatility of plastic model trees from China.  I, myself, have benefited from the seemingly implausible business model of shipping out relatively small units free of any postage charge from far flung corners of the globe, but they do and, if you are prepared to wait a couple of weeks, then they prove an invaluable starting point for any arboreal activities.  Having bagged a couple of likely candidates I remembered a post on the very entertaining 'Colgar6 and the Infinite Legion of Toy Soldiers' blog where Colgar6 had bought and used a plastic Bonsai tree for one of his terrain builds.  This inspired me to widen my search a little and I stumbled across some plastic houseplants, as opposed to model trees.   The dimensions listed suggested that they might be suitable and because they were primarily to be used for the blocking terrain I thought it was worth the risk for the princely sum of £12.
 
Having picked up some other bits and pieces, but more of those in the next instalment, I was aware that I needed more height and so went in search of trees.  The cost of wargame specific trees has long perplexed me, I once purchased a rather splendid mature oak from '4Ground' and whilst a lovely tree, and very much the pride of my forest*, I could never afford to cover the table with them.  So off I went in search of suitable material to build my own and before long I found myself perusing the visual aisles of 'The Artificial Flower Shop'.**  Again not really knowing what I was buying I narrowed my search to shape and size, plumping for three artificial Springeri Bushes at £7.80 each, the combined cost of which was the same as my Mighty Oak!  When they arrived I was delighted to find that I could break each 'bush' down into a further four trees - splendid news! 
*Not a phrase that I use often!
**I really need to get out more!
Having assembled the stands according to the John's tutorial, I gave everything a generous spray of watered down PVA in a bid to help secure the clump foliage and flock.  Once dry I was relatively pleased with the stands, but the garish green of the coloured plastic rather spoilt the effect that I was after.  Of course in John's tutorial he goes to great length demonstrating how he dealt with this very issue by painting the individual pieces before assembly.  Now being inherently lazy I had skipped this all important step, which is why John's stands look like a jungle and mine looked like a mass of plastic plants!  Unperturbed, I set about fixing the issue with a can of Tamiya Colour Olive Green and a couple of passes with the trusty airbrush loaded with Vallejo Model Air Interior Green, followed by Cam. Light Green.  Whilst perhaps not as neat as John's it certainly seemed to do the trick and a final spray with the matt varnish brought the group together - ta-da!
So a huge thank you and well done to John of the '1000 FOOT GENERAL', your tutorial was not only inspiring, but early to follow too!  Next up will be the explorable terrain and again another link to a fabulous tutorial.
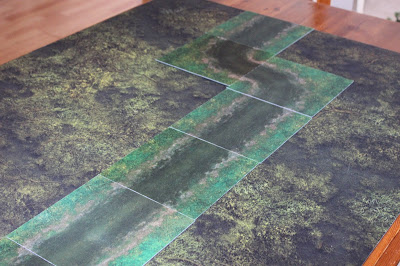
As an addendum to this post, I thought it just worth mentioning the wonderful 'Deep Cut Studio' mat that underpins my jungle.  This is their swamp design that the chaps very kindly cut to 3'x4' for me.  Made from mousemat material, it doesn't crease and can be stored rolled up.  They might not be the cheapest mats out there, but the quality is superb and the chaps are a delight to deal with.   
I had made quite a sizeable order, with a couple of mats purchased on behalf of the school, and was thrilled when I given storage cases and some terrain pieces free!  The most useful of these are the river sections that are made of the same material as the mat itself.   
They can be simply laid out to give the impression of a river and I think work rather well, so well in fact that I had to dig out the old steam launch to give her a run out through the steaming jungle!  So another thank you extended to 'Deep Cut Studio', fabulous products and amazing customer service.
Finally the seller that I purchased the plants from, via Ebay, was Alex-wqt and they were listed as follows:
  • Artificial Succulent Aloe Zebrina Plant Fake Miniature Bonsai Plant Home Decor, Item Number 401324713121 - .99p (These were the spikey ones!)
  • Single Cactus Artificial Succulents Craft Floristry Decoration Plastic Plants, Item Number 401324710338 - .99p (The tall ones.)
  • Artificial Succulents Cactaceae Floral Potted Plant DIY Home Garden Decorative, Item Number  401324708663 - .99p (The purple ones.)

Friday, 11 August 2017

Massive Darkness!

Yes, I know I promised a series of posts about jungle terrain and newly painted miniatures, but the truth of the matter is that I have been somewhat distracted by the latest offering from CMON, 'Massive Darkness'; yet another Kickstarter that I backed in April 2016.  Billed as a cooperative board game and building on the successful Zombicide: Black Plague mechanic, I nearly let this one pass me by, after all I have more plastic miniatures than I will ever paint.  Yet a chance email exchange with my good friend Stefan of 'Monty's Caravan' fame caused me to think again - solo play being the eventual hook that saw me pledge.  Well that pledge duly arrived at 'Awdry Towers' last weekend and since then all I seem to have done is venture further and further into the tunnels and dungeons, fighting guards and monstrosities along the way!
'Massive Darkness' is a dungeon crawl and allows standalone adventures or the option to play in story mode, building your characters' abilities along the way.  A huge fan of Steve Jackson and Ian Livingstone's Fighting Fantasy gamebooks as a boy, I was really looking forward to this and with what I thought was a fair understanding of the mechanic being used couldn't wait to get started.  The first thing that needs to be said is that this being and CMON Kickstarter there was a mountain of plastic to unpack!  These photographs just show the core box and don't include all the wondrous goodies that came as stretch goals.  The plastic miniatures are exquisitely detailed and I am sure will take paint just as well as the Zombicide versions; already there are some firm favourites that might yet skip to the head of the painting queue!
The quality of the card stock used for the sumptuously designed dungeon tiles is, as we have come to expect, superb and in fact all the pieces have that reassuring feel of quality to them and so it will come as no surprise to hear that the tutorial game was set up on the practice table* and away we went. Dutifully laying out the game as described, I started to become aware that there was an awful lot of paraphernalia on the table.  
Yes I am aware of how pretentious that sounds, but it really is a Godsend!  I have set up a small table in the spare room, which means I can leave unfinished games out overnight rather than pack them away so that we can use the dining room table - why hadn't I thought of this sooner? 
Event cards, door cards, treasure cards**, guard cards***, roaming monster cards, tokens, dashboards and class sheets - it was a good job that I was just playing the tutorial with only two board tiles on the table!  Unperturbed I ventured on, but couldn't help reminiscing that back in the day all I needed was an HB pencil and a couple of D6s!  Still it wasn't long before I was opening doors, picking up treasures and battling guards and banished such trifling matters as being uncharitable. 
**Five sets one for each level of Darkness.
***Again another five sets! 
Dwarves love their treasure.
Tutorial successfully completed it was time to get to grips with the first quest proper and at this point my issues with just how busy the table was started to resurface.  It all seemed incredibly faffy, I mean ridiculously so  - it was time for a rethink.  I am not a overly stupid man, but there I was sitting at a table five feet long by two and a half feet wide, covered in a multitude of cards and plastic miniatures and not really enjoying myself.  The need to check and recheck the class sheets of each of the characters, that were in turn separate from the player dashboards, meant that I was having to swap between distance and reading glasses and all the time getting more and more frustrated.  The absolute joy of Zombicide: Black Plague is its simplicity, the ability to fully immerse yourself in the story and enjoying the colloabtive nature of the game, ideally with friends, is what made us return to it time and again as our game of choice.  How then had CMON got this so wrong with Massive Darkness?  Of course the answer is they haven't, it was me!  
A very busy table!
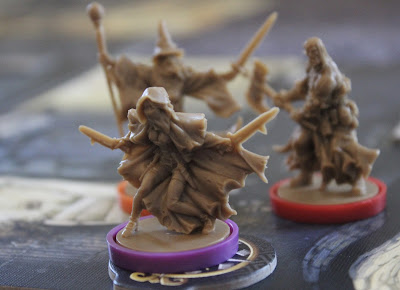
In my bid to get going as quickly as possible, I had rather fallen foul of the old maxim that a little knowledge is a dangerous thing!  Assuming that 'Massive Darkness' was, in effect, Zombicide: Black Plague by a different name, I had completely missed the point; this is a different game and should be treated as such!  The first realisation came with the number of guards that were spawned as you enter each room, it is dependent on the number of adventurers on the board. The more adventurers the more guards, so why was I trying to run all six adventurers at once?  By reducing my heroic band to a Wizard, Barbarian and Bloodmoon Nightrunner**** I was instantly able to really focus on what was important.  The class sheets, the paper pages used to record the characters' progress, were no longer spread all over the table, but stacked in order to make it easier to access.  
A Bloodmoon Nightrunner - a thief by any other name!
It was starting to feel more like the games of old, where interaction and understanding your character's unique abilities were key to success in your chosen adventure.  If you follow this approach through to its natural conclusion then the mechanic of the game should allow you to venture into the dungeon with just one character and still succeed in your quest, but I haven't been brave enough to try this yet!
****Thief/Assassin in old money!
Thou shall not pass!
So where have these revelations left me with regards to my 'Massive Darkness' enjoyment?  Mightily relieved for one thing!  I now feel that I have a much clearer understanding of what the game is all about.  As with my previous experiences of CMON board games there is a depth to them that isn't initially apparent.  The subtlety of the rules allows for complexities in the gameplay that will keep me engrossed for some considerable time to come.  
Wait! Don't open two doors at once!
Already we have had scenarios that have thrown up interesting, almost cinematic moments be they the classic 'bug hunt' or a 'temple run' style game that saw my adventurers race to the exit before the roof to the dungeon caved in, wonderfully realised by removing the preceding tiles according to the game mechanic.
Bad news for a High Troll.
It is a totally immersive game and the secret to its success is making your individual contribution exactly that - individual.  My initial mistake was trying to be too inclusive assuming that the more adventurers the better, something that we have found in Zombicide: Black Plague.  With 'Massive Darkness' the enjoyment comes through the development of the individual characters and I am really looking forward to playing this with a couple of friends to see how their own characters develop through the twists and turns of the dungeon's tunnels.
A Barbarian doing what a Barbarian does.
Related Posts Plugin for WordPress, Blogger...