Wednesday 31 May 2017

Village Rice Barn

One final Bushido post to see out the month.* This was a lovely little kit from ‘4Ground’ and given its discreet footprint, perfect for our smaller Bushido board.  I know that the seemingly unchecked march of the MDF terrain piece onto gaming boards up and down the length of the country is not to everyone’s taste but, as I have mentioned before, I really enjoy putting these kits together.  They really are very clever and provided that you don’t rush at them, relatively straightforward to assembly.
*Is it really June already?
With the addition of a couple of hand carts my Bushido themed month has come to an end.  Rest assured we are still enjoying our weekly meet at school, although the imminent examination period is starting to demand more and more of my table top gamers’ time.
That said I am hoping to run the club again next year and have started assembly of some further additions to the Savage Wave that were picked up at Salute this year.  So hopefully more to come on this theme in the future, who knowns perhaps even a game report?  However for the time being all focus will be shifted to ‘Forgotten Heroes’ and a truly bizarre change of topic!

Monday 22 May 2017

A little more terrain.

Following on from the previous post, and having run out of 40mm and 60mm ‘Warbases’ MDF discs part way through my Cherry orchard construction, I was left with two remaining trees.  Not wanting to abandon them, I decided to plant them together on the same base and as I offered them up to an 80mm MDF ‘Warbases’ disc inspiration struck!  
Although a smidge too close together they did give the impressive of forming a natural arch through which one might stroll whilst devising haiku.  To further enhance the illusion I decided to add a Shinzentōro Japanese Lantern, again from ‘Master Crafted Miniatures’ and some paving slabs to help avoid getting your Geta wet from the morning dew.

どういう奇妙なことだ!
生きている
桜の下に。

What a strange thing!
to be alive
beneath cherry blossoms.
― Kobayashi Issa
Feeling a bit pleased with myself with the Cherry Blossom archway, I reached for another 80mm MDF ‘Warbases’ disc, but this time I had another plan.  When I placed my order for the tree armatures I had also chanced upon, what I hoped would be, suitable Bamboo stands.  On closer inspection there were three different heights and the plastic was a little flimsy and of course a wonderfully lurid green.  As a result nothing had happened with them, until now!  
I had in mind to create a Bamboo screen to block line of sight and so started with some off cuts of blue foam to raise the height just that little bit more.  I also had one more piece of 3D printed scenery from my splurge on the ‘Master Crafted Miniatures’ site and so this base was going to be the perfect spot for my Gorintō.  Slowly, but surely the screen was taking shape and with the final addition of the Bamboo stalks, although I did have to pre-drill the holes as the plastic was so feeble, the basic construction was finished. 
Painting followed a fairly predictable palette, particularly with the groundwork.  The lurid green shoots were simply give a blast with an Olive Green Tamiya aerosol I had lying around, which seemed to the trick and with a smattering of leaf litter and a couple of larger green tufts the build was complete.
So two additional terrain pieces that I wasn’t planning on building, but ultimately really pleased with their outcome.  Both pieces have already been used and the bamboo screen works particularly well, I just need to watch out for those pesky Tengu Descension and their ‘Fly’ trait!

Friday 19 May 2017

Cherry Blossom

This post, and the resulting terrain items, are as of a direct result of a post I read on the wonderfully entertaining and creative ‘da Gobbo’s Grotto’.  It has been such a boon to my own Bushido development having Andy’s work as inspiration and reference and the post in question, imaginatively titled*, ‘Cherry Blossom’, is no exception.  
The post in question details Andy’s process of making a series of cherry trees in full blossom.  I was so taken with these that I decided to have a go myself and to all extents and purposes copied his method to the letter.  As a result I won’t go through a blow by blow ‘how to’ here instead you can read that on Andy’s blog, but I will point out my own observations.  
*So imaginatively titled that I stole that as well!
I have often wondered about the reliability or even logistic improbability of ordering cheap trees from China.  Would they ever turn up?  Are they any good?  Hearing that Andy had had a good experience encouraged me to give it a go and whilst I am not in the habit of throwing money away I had resigned myself to the fact that I could cover the loss in funds if they were to go awry.  Fortunately they arrived in good time and just as described.  Whilst I may wrestle with my conscience regarding my ever increasing carbon footprint, it is difficult to knock the service!
Like Andy I placed my trees on two different sizes or ‘Warbases’ MDF discs, 40mm and 60mm.   I had already ordered some of the rather nice 3D printed Yukimi Japanese Lanterns from ‘Master Crafted Miniatures’ and decided to place one on each of the larger bases.
This really was the only departure from the ones showcased on Andy’s blog and I really can’t stress how straightforward it all was, a measure of just how clear and insightful the original post was.  Unfortunately I didn’t have enough bases in stock to do all ten of my trees, but I have a cunning plan for the couple left over – more of that in the next post.

Sunday 14 May 2017

Zuba, the all seeing

So what does every hard pressed Bakemono need when he is being battered around the board?  Well a bigger, meaner friend of course!  Zuba is certainly that, standing an impressive 60mm tall with a 50mm base, which I quickly swapped out for a ‘Fenris Games’ version that matched his little compatriots.  Compared to the Bakemono, Zuba the all seeing was a doddle to put together, in effect two big lumps of metal pinned together.  There was the small matter of a couple of antlers/horns to contend with, an unnecessarily fiddly extra in my opinion and already I have had to repair them a couple of times.  Although affixed now, if one of them goes again it might simply be a case of filing them down and moving on.
When it came to painting I found it difficult to steer away from the box art and so red became the predominate colour.  In a bid to link him in with the rest of the group the cloth, armour and leather was all given a muted feel to it, as if it were old or second hand.  Finally some gore on his massive mallet and I had completed my first Bushido faction.
When it comes to using him in the game, I have had mixed results.  Initially I would throw him up the board, taking advantage of his extra range, but this saw him fall foul a couple of times to long range shooting by the powerful Minuro.  Interestingly a more cautious approach hasn’t helped either as opponents would simply run away denying him the opportunity to unleash his powerful attacks.  
Part of the problem has been that we have been running quick, low rice value, games to get the maximum amount of turns in, but this doesn’t seem to play to the strengths of the Savage Wave.  More recently we have just fielded a horde of Bakemono which generate more Ki and ultimately more mischief.  This has proved much more entertaining!
More terrain next!

Tuesday 9 May 2017

Bakemono

So with our Table Top Gaming club up and running at school and the Bushido board starting to take shape we were enjoying learning the rules with the Tengu Descension and Prefecture of Ryu Starter Sets.  Both these clans have impressive qualities to them and the models really were lovely, but I started to think about getting my own faction in play.  Now I think it is fair to say that I am not a good wargamer insomuch that I lack patience and will often charge in, committing my troops to engagements that they clearly have no chance of winning in a bid to get things moving.  So when it came to choosing my own faction, I was looking for something mischievous, something that didn’t necessarily play by the rules – enter the Savage Wave!
A cursory look on the GCT Studio's website told me all I needed to know, goblin like beasts that flooded around a big bruiser of a monster, surely that would work for me?   Quoting directly from the company’s website:

They take the form of evil creatures of myth and folklore. From where they come or why, no-one knows, but one thing is for certain, the wave crushes everything in its path. The Oni and Bakemono demon-creatures that make up the bulk of the Savage Wave appear bent on the destruction of humankind and all that is holy, but they are not mindless – as many opponents have found out at great pain, the Savage Wave is cunning and organized, and it operates according to its own weird and unknowable logic.

With the starter duly ordered and unpacked, my heart sank!  I had had some experience with pinning and fixing small pieces with my Penguin Crew from ‘Knight Models’, but staring at me from the remnants of the packaging were a multitude of small parts, I just didn’t know where to start, let alone comprehend pinning such small individual pieces together.
A chance conversation with Mike ‘The Dark Templar’ Reynolds saw me invest in some superglue gel and start to think about where the stress points were going to be for each model.  By gluing not just where each limb attached to the body, but considering allowing the limbs to rest on other parts of the body, I could increase the number of contact points and possibly negate the need for pinning altogether; at least that was the theory.  To add to my woes I had decided that I wanted the bases to be a little special, in this case a forest theme, and had ordered up some 
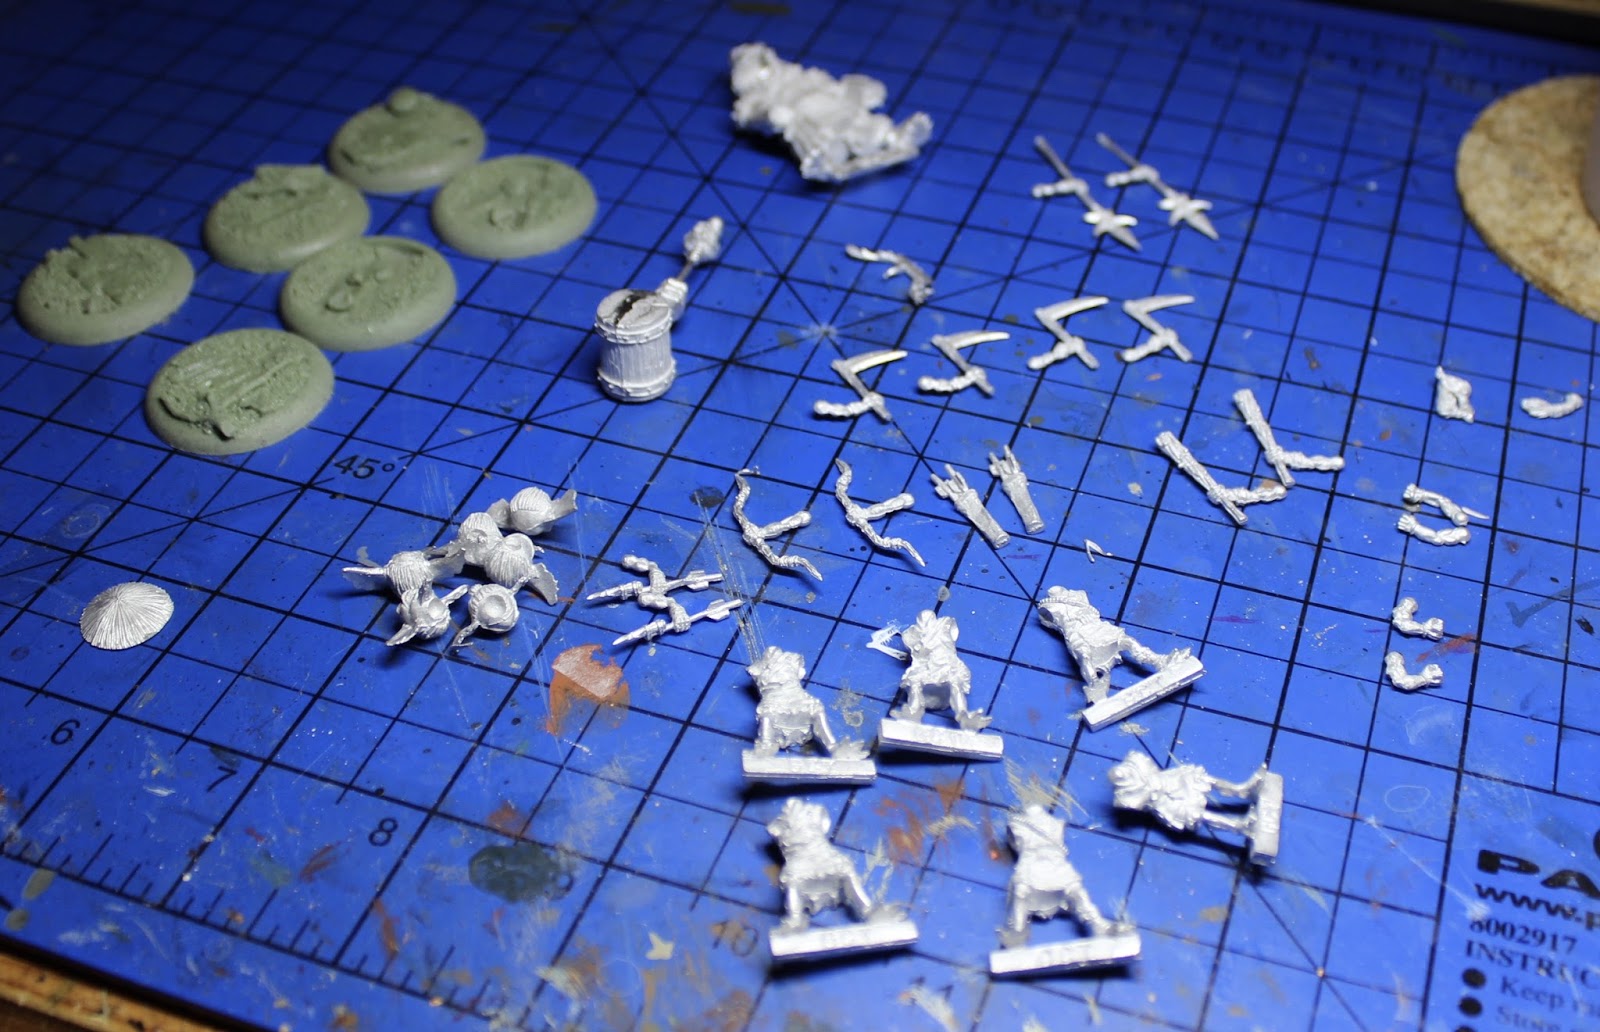
‘Fenris Games’ resin bases.  Of course this meant more cutting and pinning, I really am a glutton for punishment!  Having procrastinated for a good while, I finally got around to starting and was pleasantly surprised at how well they went together.  The starter set came with enough pieces to make six Bakemono either Archers, Bushi, Spearmen or Beaters.  I had decided not to use the Bushi parts, which with hindsight might be a mistake, but I suppose that I could always add some more in due course.
So safely constructed and primed it was time for a lick of paint and now with built miniature in front of me, I couldn’t fail to notice a striking similarity to the protagonists of the 1984 film, ‘Gremlins’.  Now channelling my inner Spike, I tried to mimic some of the colouring in my own little band.  I imagined that the Bakemono weren’t particularly fashion conscious and so went for muted, sombre colours as if from the earth.  So with a little gore and poison tipped arrows they were done.
How have they fared?  Well the Bakemono are weak, but their strength lies in numbers and having the ability to 'Summon from the Shadows' or move around unencumbered in the dark is definitely good fun.  What they need, of course, is a powerful ally and this is where my Oni comes into his own, but more of that in a later post.

SaveSave

Friday 5 May 2017

Bushido!

Work is incredibly busy at the moment and what with the public examinations about to get into full swing there is little sign of this drain on my hobby time abating anytime soon.  Fortunately I have a series of posts prepared and, taking a leaf out of Simon's 'Fantorical' blog, I have decided to cobble them together into a loosely themed month of ‘Bushido’ goodness.  So to get things underway a brief introduction and some terrain pieces.  
In a bid to offer a little more variety to our afterschool activates schedule, I decided to put on a Table Top Gaming Club at school.*  This has proved a great escape for me and an opportunity to get a little midweek gaming in.  Now it would be fair to say that this has not been the most popular of clubs, but my little band of enthusiasts initially started out playing some of the Kickstarters that I had backed including ‘Rum n Bones’ and ‘Space Cadets’.  This was all well and good, but when one of the chaps said that he had been playing ‘GCT Studios Bushido’ it seemed only right to encourage him to introduce it to the group.
The mere mention of the word war, let alone wargame seemed problematic, but we managed to side step that one!
Initially we just played on one of the tables having used masking tape to define the edges of the board, but I desperately wanted to enhance the experience for them and set about gathering together a few bits and pieces that could be used.  I knew I had my board that could be made serviceable with a couple of running repairs and I already had some bamboo groves that I had made to represent the Burmese jungle with the addition of the Silver Birch trees that I had put together things were starting to take shape. 
Further inspection of the bits box unearthed a Buddha aquarium ornament that didn’t even need painting and a couple of ‘Ainsty Castings’ Foo Dogs that for the life of me I couldn’t remember why I had initially bought!  To these I added a couple of ‘Sarissa Precision’ MDF kits in the form of a bridge and Torri gate.  By the time that they had all been assembled and painted the board was really starting to look the part, but what I wanted now was my own band of miniatures!
Related Posts Plugin for WordPress, Blogger...