Showing posts with label Terrain and Scenics. Show all posts

Tuesday, 20 August 2024

I have an elephant fetish!


Now there is a title to solicit all manner of casual browser!  By way of explanation, the planned scenario for the Congo game was based on a couple of adventures sandwiched together from the rule book.  The premise is that a mysterious artifact has to be located and taken somewhere else.  I already had my ape totems, but needed a total of six items and so set about creating some new fetishes.  Having had success with the playmobil monkeys, I had hoped that they may yield a suitable alternative but nothing seemed to fit the bill and so an extensive trawl of the infoweb followed.  With some considerable luck, I stumbled across these cheap metal pendants from a buyer on Etsy and simply trimmed of the hoop at the top and stuck them to some chunks of foam.  

These were, in turn, fixed to some MDF bases that were textured with pumice paste and small stones.  Once everything was dry some fine gauge chain was wrapped around both and made to look as if the chains had cut and eroded into the stone over time.  A few touches of superglue were required to keep everything in place and stop the chains slipping. 


The build was effectively done at this stage, but I have seen African Fetish sculptures and had a lasting memory of the nails, driven into them; dark, truly terrifying items.  So I did what any rational minded hobbyist would do and unearthed a bag of plastic skulls and cut lengths of floristry wire into tiddly, tiny pieces - the descent into madness was complete. 


I made painting far too difficult for myself as I was worried that my trusty rattle can primer would melt the foam.  Instead, I chose to paint the rocks separately and then applied a coat of matt varnish to the metal pendant before  giving it a series of heavy washes.  I allowed the rust to colour the rock and everything was flocked to show that these were very much part of the jungle.

On to the game!

My previous monkey totems can be seen here.

Sunday, 4 August 2024

The Swamp!

 
With the game day fast approaching, I needed to turn my attention to terrain.  The scenario I was working on called for our intrepid explorers to try to escape the attentions of the Forest Tribes and make it safely back to their paddle steamer; to do this they would have to pass through the swamp!  

Congo has various different terrain classifications, one of the most exciting being the Dangerous Terrain.  When a group enters this terrain it most 'explore' the area which can throw up all manner of twists and turns.  I wanted to create some pieces of large terrain that our explorers had to pass through in order to reach the river, but also wanted to make the distinction that this was now a swamp area as opposed to the dense jungle previously encountered.  The results of that earlier build can be seen here:

Dangerous Jungle Terrain


Having thrown down a couple of printed mats to get a feel for the lay out, I was able to see how many pieces I would need, essentially three large areas to pass through and some blocking terrain to make the swim to the boats a little more tortuous.  I was fortunate in that I had some MDF terrain bases left over from the jungle build, I believe from East Riding Miniatures, but can highly recommend 'Wargames Tournaments' and 'Charlie Foxtrot Models' who also do similar packs and have excellent customer service.


I had a vision in my mind's eye of a dense, overhanging, verdant swamp but wasn't sure how to achieve it until I spied some bog wood, long abandoned, lying in our garden.  Bog wood, when immersed in water becomes incredibly heavy and forms an amazing, natural aquascape for the aquarium.  The twisted contorted shapes were just what I was looking for, but it is expensive.  This piece had formed the centrepiece of our aquarium, but the Saintly Mrs. Awdry's fishy friends kept growing and so had to be removed to allow more space for them.  Given its initial cost, I couldn't bring myself to throw it away and so it had been placed outside from where I was happy to recycle it for the build.

I cut the decoration down into three smaller sections, apportioning each piece to one of the irregular shaped bases I had chosen. Using off cut foam, I decided where I would have a way through the swamp and then braced the bog wood trunks in place with chopped down toffee apple sticks. This was a 'Eureka!' moment for me as I knew then exactly how I was going to realise my ideas!


The toffee apple stick braces had two purposes, structural integrity and to sell the mangrove swamp aesthetic.  Balance was key and I needed to consider carefully where the bog wood branches hung in relation to base profile, the sticks were key to support this.  They also allowed me to form the mangrove swamp roots that I was hoping to achieve.  Initially the stick itself was covered in milliput and given some simple texture before I added lengths of milliput rolled into tapered coils to represent the probing tendrils.  The joins were smoothed into the existing branches and allowed to set before given a quick blast of colour with the airbrush. 


Whilst absolutely thrilled with the progress so far, I felt that two of the larger bases needed some more branches in order to add more depth.  To achieve this, I took some thin willow branches cut to lengths and pinned them to the trunk before applying milliput to conceal the join and added additional tendrils.  Once everything was in place and set it was just a case of adding colour with a dry brush, the natural texture of the bog wood creating some wonderful effects. 


With the main structures completed, I just needed to add the hanging moss.  This is essentially teddy bear filling soaked in PVA glue and coloured ink with some basing turf sprinked in for good measure.  A ridiculously messy process, but one I had had some success with before in another swamp build.  See here: Through the Swamp

To complete the bases, self adhesive tufts, flock and some leave litter were all added.

The three main swamp bases were now complete and I just needed to fashion the remaining two blocking islands.  These were designed to form obstacles for our hapless adventurers to swim around and so were not to be considered explorable.  I had a couple of smaller MDF bases to hand and just added some foam as a base, using up the last of the milliput to smoothen the edges.  


Added to this were some aquarium plants that I had left over from the jungle build, but I wanted to achieve something more akin to the dense reeds that we see Charlie Allnut try to navigate the hapless African Queen through.  For this I sourced Long Reed lengths from the incredibly helpful 'War Paint Figures' and simply pressed them into the foam having first dipped the ends into some PVA glue.  I had hoped to give these stems some paper leaves, but time got the better of me and so had to make do with loading the base with various basing materials to finish the illusion. 


A fun and rewarding build, I was genuinely stoked at how well they had turned out using mostly found materials at my disposal.  I now had treacherous swamp terrain that my adventures would have to pass through in order to make it safely back to their boats.  That should have been everything completed for the game, but of course there was just one more thing I felt I needed!

Tuesday, 23 April 2024

The smallest room


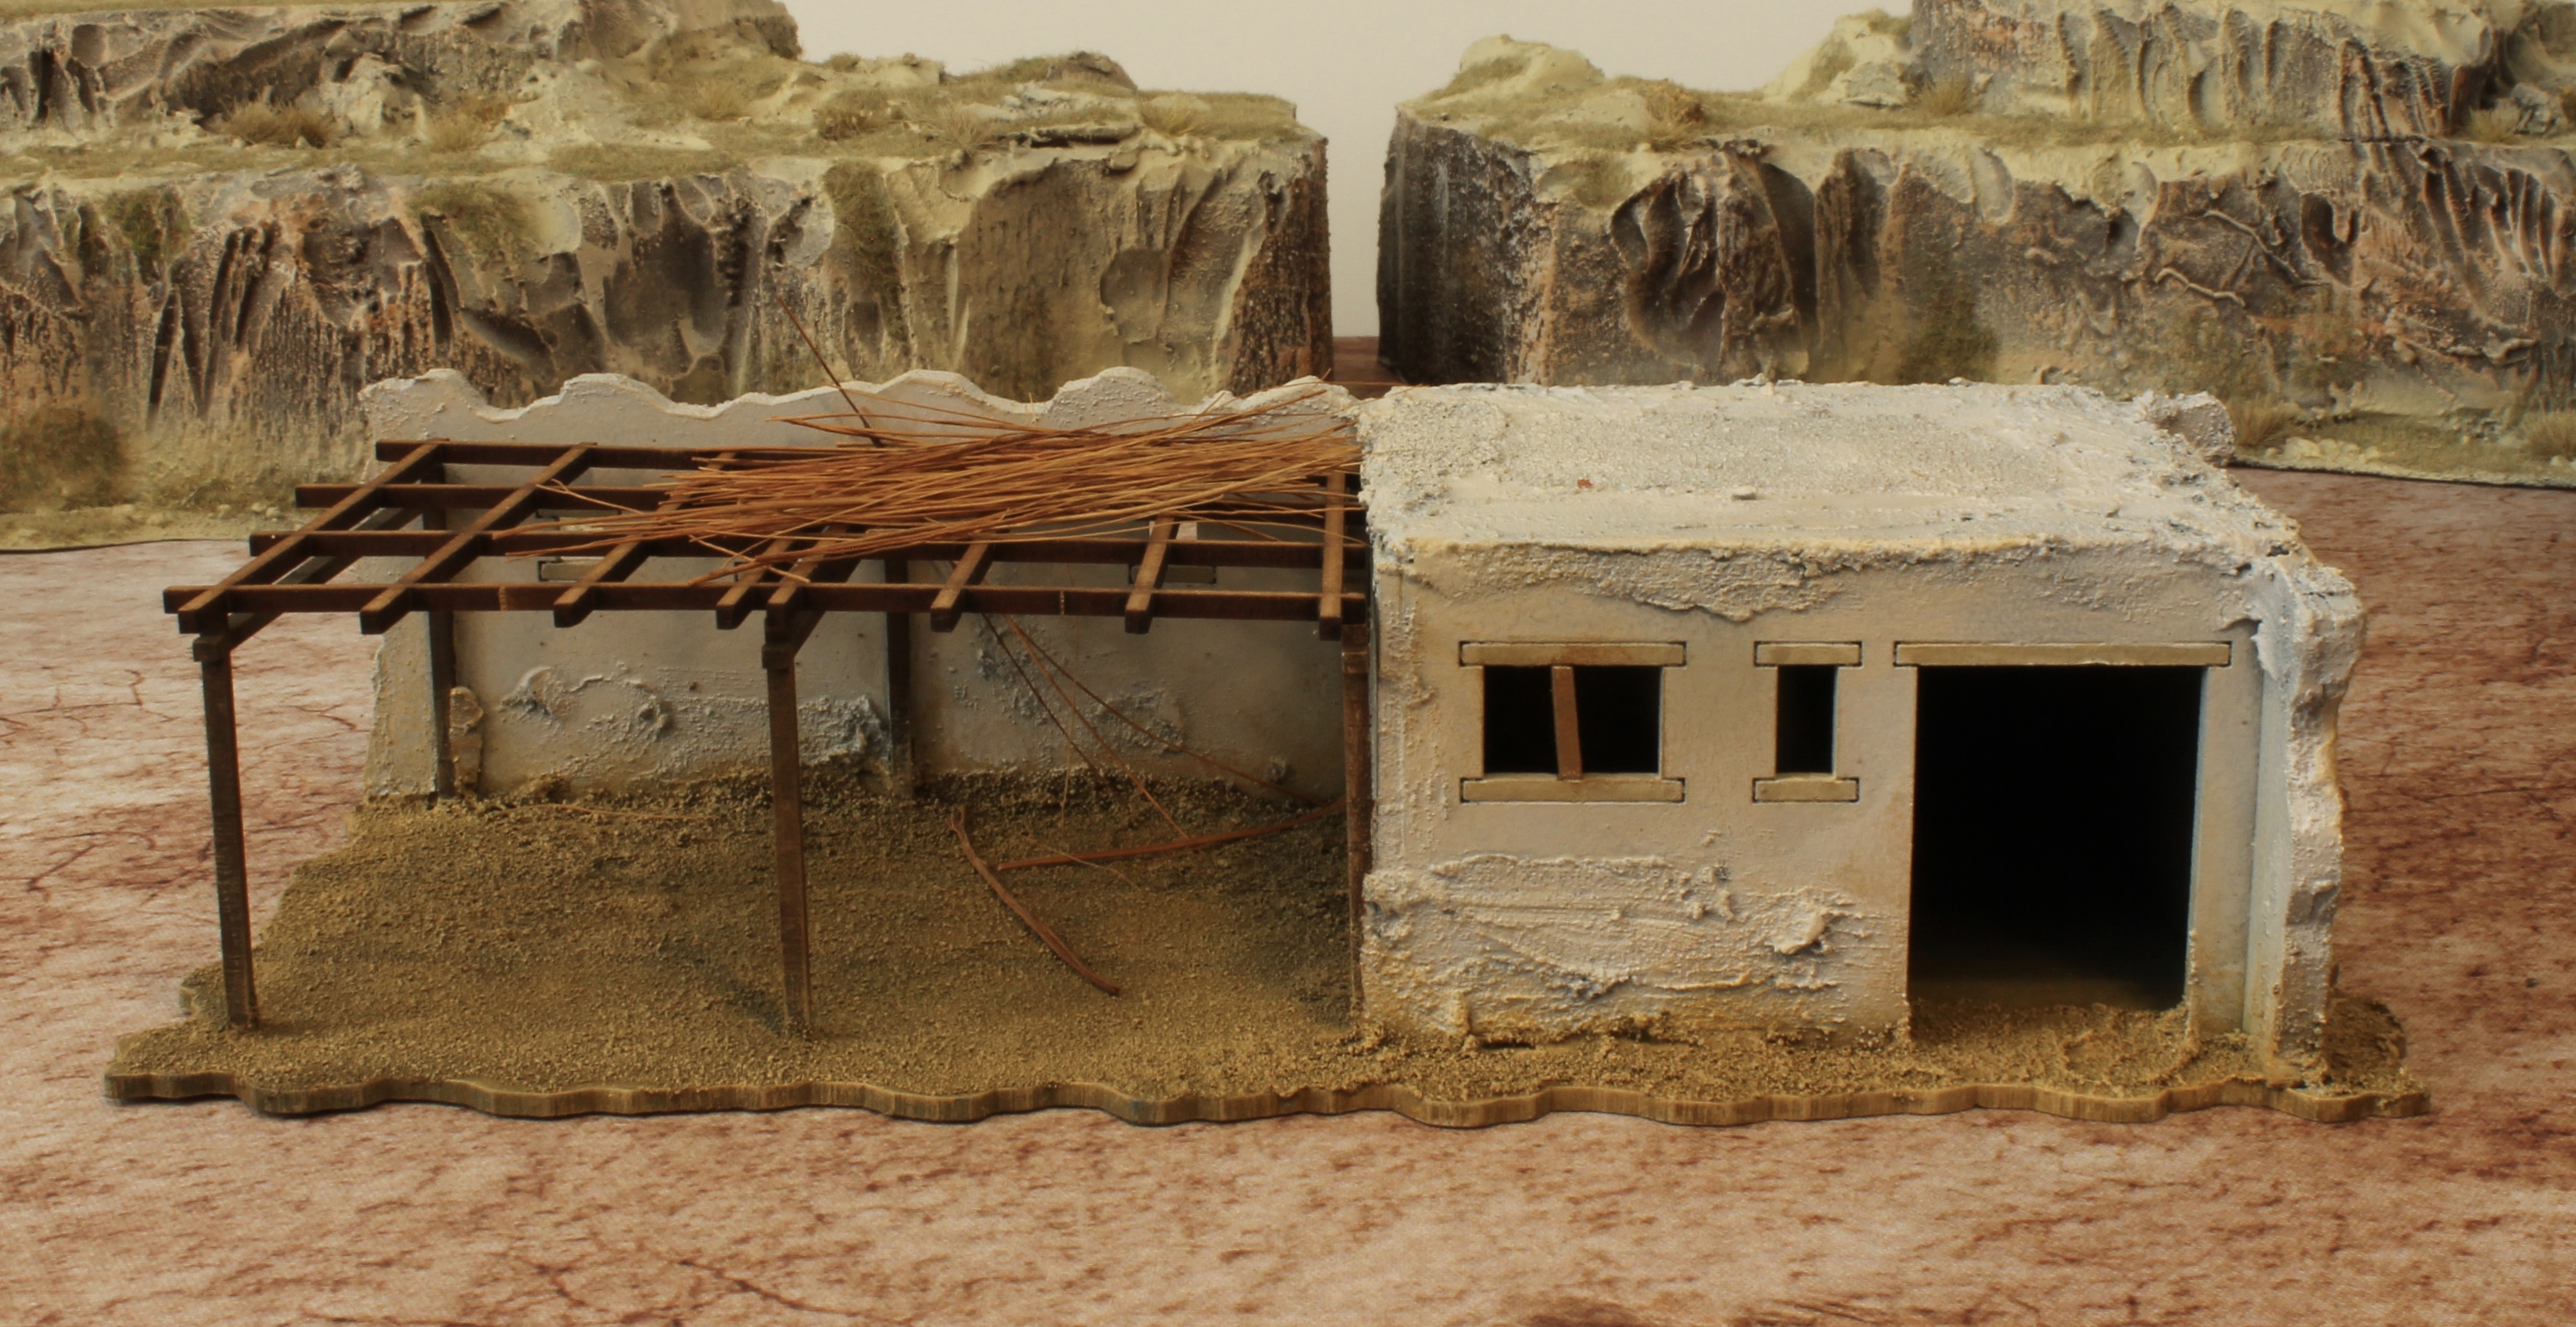
With the main village buildings for our game of Shoot 'N' Skedaddle completed, and in good time I might add, there was an opportunity to add a little local colour in the form of a few 'extras'.  The first of these pieces was the ubiquitous outhouse, a seemingly ever present motif in the western films of my youth, the crude, hastily constructed structure was often festooned with flies and proved to be the last stand for many an unsuspecting outlaw; one of those silly things that I just had to have a go at building!  After sketching out a rough design, I started to build the basic structure on a 60mm MDF base using scraps of balsa wood into which I etched a plank design.

I couldn't dismiss the idea of having a working door, which started life as a scrap of mountboard, cut to give the impression of reclaimed planks with some additional supporting braces.  With the moon motiff scratched in, a little nod to another 'famous' outhouse, albeit from animated gem that is Shrek, I set about fashioning the hinges.  These were essentially paperclips cut down to size and bent to form the staples fixed into the door frame and then a couple more pieces formed into hooks to attach the door.  Although not the perfect solution, it did work and allowed me to move onto the painting and detailing of the base.


This part was a lot of fun and the bits box unearthed a good selection of miscellania to give some additional colour to the piece with barrels, plastic cacti and even a bucket to put under the seat.  With a slightly troubling level of detail, I even carved a hole into the seat and added to toilet paper using pieces of tissue paper.

Next up was the village well, which I remember from the Magnificent Seven as being the venue for the stirring speech by Horst Buchholz playing the irrepressible Chico.  I was about to start scratch building when I remembered that I had bought a 'Sarissa Precision' fountain from the 'Streets of Rome' range.  I had imagined that this was going to form part of a war torn city for my 'wintery' Russians to fight over, but I had never got around to it, but with a little imagination it may find a use here.


Hastily assembling the kit, it became apparent that the ornate central fountain was a little too much for my sleepy Mexican village and so I decided not to site the central column, instead I offset part of it to one end and added a little 3D printed water pump that had surfaced earlier during my excavation of the bits box.*


*I can't say with any certainty where this piece had come from, but I found an almost identical version here https://shop.winterdyne.co.uk/product/cast-iron-water-pump

It was starting to come together nicely, but I felt that the side detailing was still a tad ornate so out came the wood filler again to give a more worn feel to the piece.  The base was then textured and the whole thing primed for the final stages.  Once painted to match the existing pieces, I filled the fountain base with some Vallejo water effects, lightly coloring the 'water' with a little blue ink.


Now very much on a roll, as it were, I decided to try my hand at another stalwart of the classic Hollywood Western, tumbleweed.  On reflection this wasn't as successful as I had hoped, simply because it is a device that is rather relient on movement, but nonetheless a bit of fun to end the proceedings.  Lengths of sisal string were cut and then the individual strands separated out before dipping in a bath of watered down PVA glue.  Once the crude structures were dried, they were washed in a sepia tone to give a little more depth.  This wasn't as successful as I had hoped as the PVA seemed to repel the ink, but enough colour remained to sell the illusion.  With hindsight, I am wondering if some rubberised horsehair might have been a better solution?

Tumbleweed under construction! 

All in all a hugely enjoyable series of diversions that added some fun talking points to the board.  I am sometimes guilty of forgetting just how much fun scratch building terrain can be, always seemingly looking for the 'perfect fit' kit or model to adorn the board, when actually just adapting some of the shop bought kits can be great fun.  

Thursday, 4 April 2024

Cacti

I make no excuses to my over romanticised, some would say naive, approach to the historical periods that interest me.  A perfect example of this would be my wholly sanitised foray into the Wild West inspired by the many Hollywood celluloid spectacles.  A lasting memory of those films was the tall cacti that seemed to dominate the landscape and so I set about to see if I could find some to add to the terrain around my village.  A rudimentary search of the infoweb unearthed a number of potential finds, particularly if I was prepared to 'print' my own, something I hope to get into one day, but at the moment I seem content with purchasing files that sit neglected on the computer, not that different to the unpainted miniatures in the wardrobe of woe.  

There were some Saguaro like models available in either white metal or plastic, but these were proving to be quite costly and were lacking the stature that I was after until, as luck would have it, I stumbled across the following 'how to' on the Western Role Playing & Miniature Games Resource site. 
 

So as to not be accused of plagiarism, I am happy to admit that I followed this wonderfully clear guide pretty much to the letter, so there is little point replicating it here, but I will share some of my 'work in progress photographs' to reiterate just how straightforward it was. 
I used a combination of 6" and 4" nails with aluminium, armature, modelling wire to form the basic structures.  These were then covered in Sculpey, not a material I had used before, but not unlike DAS modeling clay, which might prove to be an cheaper alternative.  Drawing lines into the clay would convey a sense of the cactus structure, but on reflection I rather rushed this stage, perhaps more modelling would have produced more varied and interesting results?  Once baked and cooled they were fixed to some MDF bases and the surfaces built up and textured accordingly.  I indulged in some Buffalo and Longhorn steer skulls from 'Dixon Miniatures' just to sell the piece a little more. 
With time very much against me, I fired up the trusty airbrush and covered them in a rather lurid green that was not nearly dusty enough.  Fortunately some drybrishing helped to get the project back on track, but something still felt as if it was lacking.  
In a bid to give my cacti some more texture I dabbed dots of PVA glue along the trunk and then sprinkled on some fine green turf that I had.  A final flourish was added with a course, red turf used atop to hint at the ripening fruit. 
With the bases painted to match the rest of the miniatures and the liberal application of some brown shrubs and tufts the build was complete.  Thoroughly enjoyable and with that sense of achievement that comes from a successful scratch build.  Huge thanks to Western Role Playing & Miniature Games Resource for pointing the way.

Monday, 25 March 2024

The Village

Just the briefest of posts to showcase the rest of the buildings that were done in readiness for our western adventure using the Shoot N' Skedaddle rules.  All are from 'Sarissa Precision', but not all from the most obvious areas of their collection.  True, the small Adobe houses and the Cantina were certainly from the 'South of the Border' range and very nice they were too.  Quick and easy to put together and painted to match the church.  As with all MDF builds the overly straight edges and joints sometimes spoil the look, but some cheap wood filler worked really well at concealing these whilst also added a pleasing level of texture.


I discovered the destroyed single storey souk building in the North Africa/Colonial section, but just felt that the arches were remisnetct of the architecture form the village that starred in the Magnificent Seven.  By the time it was painted using a similar colour palette to the rest of the buildings it certainly seemed to fit with them.
A chance discovery in the Mediterranean section unearthed this small house.  I simple disposed of the pitched roof, added lashings of wood glue and used reeds instead of vines to create an animal shelter for the villagers.  Whereas the rickety fencing was from the Japan section and catalogued as 'Mountain Village low farm fence'.  They fitted in with the worn down look I was hoping to achieve and seen here in the last picture protecting my 'Warbases' hay stacks.

Looking at back at these photographs, I can see lots of areas that could have been enhanced even further with a bit more time, but with these pieces done, the village was good to go.  As with all my projects what followed can only be described as mission creep and as soon as the photographs are thinned down, I shall share with you where my wild machinations led me next.

Sunday, 17 March 2024

The Church


Having decided to create a sleepy, little Mexican village for our gunslingers to fight over, inspired by the wonderful 'Magnificent Seven', I found myself pouring over the virtual pages of 'Sarissa Precision'.  I appreciate that MDF on the tabletop is not for everyone, but I have to confess to rather enjoying the building process and with some liberally applied wood filler and texture pastes, it is possible to minimise the angular look of the kits.  
It would also be fair to say that 'Sarissa Precision' are at the top of their game, clearly looking to push their designs further than most, not settling for the basic structures, but incorporating more etching and clever construction techniques to produce some really top quality models.  The Mexican Church#2  from their South of the Border range is a case in point.  Instantly recognisable from the aforementioned celluloid gem, this was a 'must have' centerpiece for my village, offering cover and a considerable vantage point for those lucky enough to secure the bell tower for their side.
With the texture of the walls done the painting was really straight forward with just base colours and dry brushing.  As with all projects, I could have taken things further, but time was marching on and there was still quite a list of 'things to do' before the scheduled game day.  The base plate was textured and painted to match those of my villagers and bandits and with some tufts of weeds added the first bit of real estate was complete.  


Related Posts Plugin for WordPress, Blogger...